Welcome to my blog! Today I’m part of a Spellbinders Blog Hop where we create a project with our favorite Club Kit of 2023. I’m a humungous fan of Spellbinders’ products, and to pick just one is kind of impossible; however, one club that really caught my attention this year is June’s Large Die of the Month called Whale in a Bottle. It’s adorable, it’s versatile and it’s very detailed. It comes with many dies to create an underwater scene with a whale, but you could put anything in this fabulous bottle. Which is what I’m doing today.
Check out my YouTube tutorial below if you’d like to see how I put together these two cards! There are more pictures and links below!
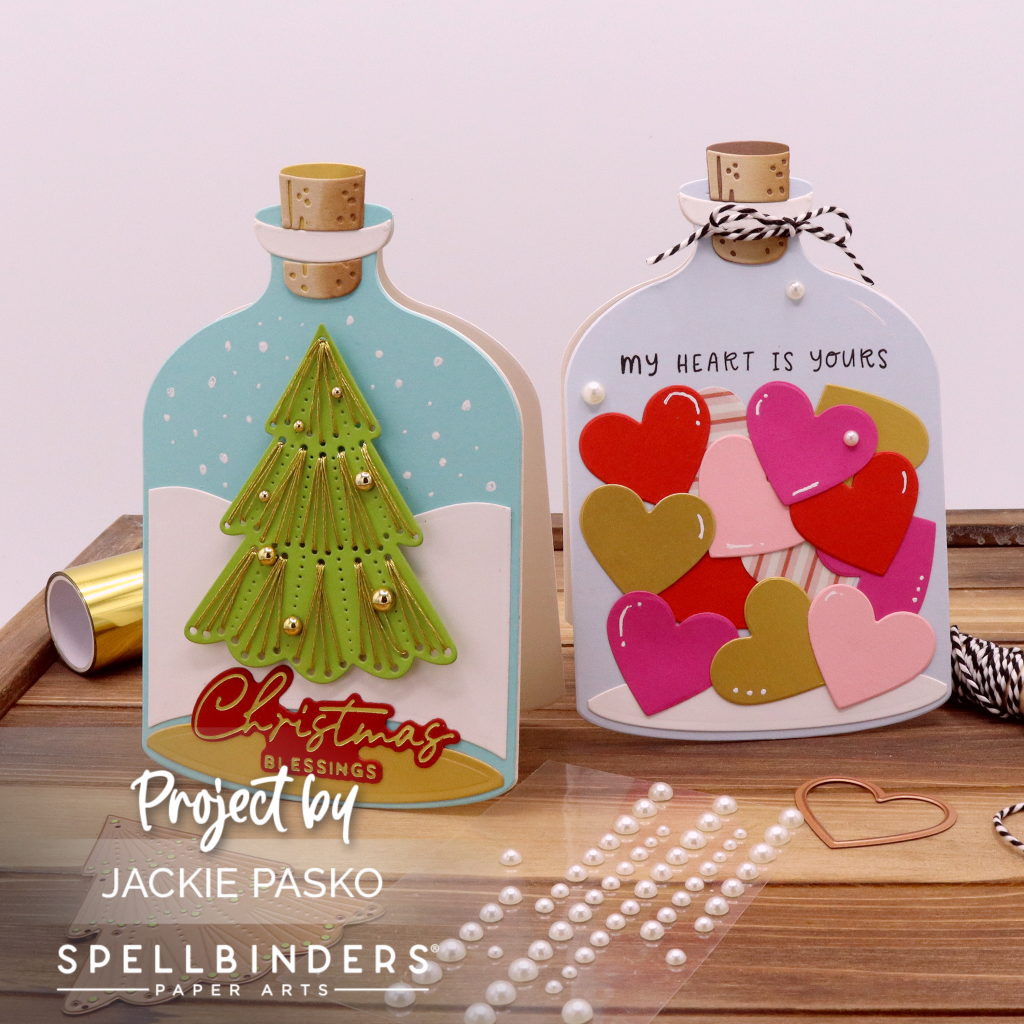
For my first card, I decided to put hearts in the bottle for an adorable Valentine’s Day card. I used the bottle die to create shaped card bases for both of my cards. The sentiment comes from December’s Clear Stamp & Die Club called Big Love. I love how this one turned out! I also added some oyster pearls and a little bit of black and white twine around the top of the bottle.

For card number two, I’m using another of my tip top favorites called I’ll be Home for Christmas Stitching Die from October. The little Christmas tree fit perfectly in this bottle! I stitched the tree with gold embroidery floss and created a little winter scene behind it. I added snow with a white gel pen and a few gold pearls to decorate the tree.

All of the links to these products are listed below. To celebrate this release, Spellbinders is giving away a $25 gift certificate to 3 lucky blog readers – selected from the comments on their blog. Giveaway closes on Sunday, December 10th, 11:59 pm MST. The winner will be announced in there blog hop post the following Wednesday.
Click this link: http://shrsl.com/4c7lm if you’d like to see more clubs from 2023 that are still available!
Below is the list of the other designers in this hop! Enjoy!
Spellbinders BlogYou are Here! Jackie Pasko
Michelle Woerner
Lin Brandyberry
Alanna Moses
Rebecca Keppel
Teri Duncan
Carrie Rhoades
Jill Hilliard
Pam Sparks
Rachel Alvarado
Erin Thompson
Cassie Trask
Deborah Jenkins
Melody Rupple
Lauren Taylor
Ilina Crouse
Vera Yates
Product Links:
Whale in a Bottle: http://shrsl.com/4c67z
I’ll be Home for Christmas Stitching Die: http://shrsl.com/4c680
A Merry Little Christmas Sentiments: http://shrsl.com/4c683
Essential Hearts Dies: http://shrsl.com/4c68c
Big Love Clear Stamp & Die of the Month Club: http://shrsl.com/4c4ho
White Gel Pen: https://amzn.to/3t53RTY
Gold Embroidery Floss: http://shrsl.com/4c68a
Oyster Pearls: http://shrsl.com/4c68g
Gold Pearls: http://shrsl.com/4c68h
The Deluxe Caboodle Value Club Membership: http://shrsl.com/4c4hr
Other Products Used:
New Paper Trimmer & Scorer: http://shrsl.com/4acfb
Replacement Blades: http://shrsl.com/4acfd
Adhesives:
Spellbinders Refillable Tape Runner: http://shrsl.com/43dtg
Tape Runner Refill: http://shrsl.com/43dti
Adhesive Bundle: http://shrsl.com/43dtl
Best Ever Craft Tape 5/8”: http://shrsl.com/43dta
Best Ever Craft Tape 0.25”: http://shrsl.com/43dtd
Best Ever Craft Tape 1.25”: http://shrsl.com/43dte
Bearly Arts Precision Craft Glue 4oz: http://shrsl.com/43dt5
Bearly Arts Precision Craft Glue 2oz: http://shrsl.com/43dt6
Foam Squares: http://shrsl.com/4acg5
Cardstock:
All Essential Cardstock: http://shrsl.com/4azt5
Embellishments:
New Enamel Dots: http://shrsl.com/45qq1
All Essential Gems: https://shrsl.com/3q7kg
All Smooth Disc Embellishments: http://shrsl.com/3q7kj
All Color Essential Sequins: http://shrsl.com/3q7km
All Fashion Pearls: http://shrsl.com/3q7ks
All Cotton Twist Twines: http://shrsl.com/4ai7o
Inks:
VersaFine Onyx Black Ink: https://amzn.to/3FKycKs
Tools:
New Tool-in-One: http://shrsl.com/3tjvg
New Hot Pink Cutting Plates: http://shrsl.com/3tjvm
New Die Cutting Machines: http://shrsl.com/3tjvq
Universal Plate System: https://shrsl.com/3l8fc
Platimun 6 Aqua Limited Edition Machine: http://shrsl.com/3l8gj
Mini Misti Stamping Tool: http://shrsl.com/3ldhf
Diamond Shaped Magnet: https://shrsl.com/2d1i3
Detail Tweezers: http://shrsl.com/2ydxg
Reverse Tweezers: http://shrsl.com/2ydxi
6 ax 6 Glitter Cutting Plates: http://shrsl.com/2ydxk
Standard Glitter Cutting Plates: http://shrsl.com/2ydxn
Magnetic Pick-Up Tool: http://shrsl.com/2ydxo
Grid Paper Pad: http://shrsl.com/2ydxr
Jewel Picker: https://amzn.to/2XtZLoT
@teamspellbinders #Spellbinders #neverstopmaking #spellbindersclubkits #papercrafts