Welcome to day 3 on the Under the Sea Hop! Click on the hashtag #saturdayunderthesea to see more inspiration from other hop participants. Today I have a fun cartoon slimline card to show you. I’m using a darling set from In Love Arts Shop called Ocean Animals & Mermaid Stamp set. I love the cute way these stamps are drawn.
I stamped the images onto a piece of Bristol Smooth cardstock. I also stamped out masks for the images. I covered the images with the masks and had fun ink blending using some Distress Inks.
I colored in all my images with an assortment of Copic Markers. I keep my Copics out on my desk because I use them so often. Here’s a picture of my messy desk–lol–but I wanted to show you these marker holders from Stamp & Storage. I love them because they have little slots in them to help me keep my Copics organized.
Hello everyone! I hope you are all having a wonderful, crafty day! I have some more cards to show you using products from the In Love Arts Shop. Most of my cards are standard A2 size cards, but I threw in a few fun slimline cards. (I’m having so much fun creating slimlines!) As usual all the products from In Love Arts are beautiful and very affordable. I also have a 15% off coupon code for you: S5581
Card #1: Hello Sunshine Slimline Card
Card #2: Embossed Flowers Card
Card #3: For You Slimline Card
Card #4: Sweet Ice Cream Cones Card
Copics: Chocolate Ice Cream: E25, E27
Vanilla Ice Cream: Y11, Y13
Strawberry Ice Cream: R20, R22
Blueberry Ice Cream: B000, B02
Grape Ice Cream: V12, V15
Cone: E31, E33
Cherry: R35
Card #5: Happy Birthday Cake Card
Copics: Y08, W1, W3, R83
Here is my process video! You can watch it here or over on my YouTube channel in HD.
Thank you for visiting! Have a lovely weekend!
Here are links to most of the supplies I used to create these cards:
Hello crafty friends! Thanks for stopping by. The first official day of summer is coming soon – June 20th, and I’m here with some fun inspiration for your summer card crafting using beautiful products from the In Love Arts Shop. I’m also using lots of Distress Oxide Inks to add bright colors to my cards.
I have a 15% off coupon code for you at the In Love Arts Shop: S5581
I love the look of this alphabet die set, and I’m used the negative piece to create this fun card. First, I blended some Distress Oxide onto a piece of white card stock using rainbow colors. I die cut the Bold Alphabet die set with another a piece of white card stock and cut it down to 51/4 x 4 inches. I used foam tape behind this panel to pop it up. I used the “H” and “I” die cuts for my sentiment. I blended on Candied Apple and Carved Pumpkin and added a double layer of foam tape behind them–the sentiment is popped up even higher than the white panel.
I love the Seaworld embossing folder, and I used it to emboss a piece of Desert Storm card stock. I wanted it to look like sand. I did leave the top of the card stock out of the embossing folder to leave me a space for my Hello sentiment. I used letters from the Bold Alphabet dies for my sentiment. I ink blended Abandoned coral over them and popped them up with foam tape. The “summer” sentiment comes from the “Summer Vacation” stamp set. I stamped it over a piece white card stock which I ink blended some Tumbled glass onto.
This was a fast and fun card to put together. I used more rainbow colors Distress Oxide Inks, and covered it with the Dream die cut. I also die cut it out using some silver metallic paper so I could adhere some silver stars around the panel.
The Blooming Rose Die took up most of the space on this card–I love big dies like this. I took the pieces out of the rose and pounced my ink blending tool on them to get this fun dappled look. I them glued them in place with dots of liquid adhesive. I used the bold alphabet dies again for my sentiment on this card. Another reason I love alphabet dies is you can create your own sentiment!
Distress Oxides: Candied Apple, Twisted Citron
Card #5: Summer Sunshine Card
The images from the Summer Vacation Stamp set are so detailed and cute. I stamped out the sunglasses and flip flops first, masked them, and then stamped the towel. I had to mask the towel to stamp out the tote bag. When you overlap images like this, it make your card more interesting. After all the images were stamped out, I put masks over all of them and ink blended on more Distress Oxides. I wanted it to look hot and summery. I then colored in all my images with Copic markers.
Here’s another big cutting die! I adore it! It’s perfect for making up some fast and cute birthday cards. I masked off the edges of a piece of white card stock and ink blended the same colors that I used on card #1. I left the cupcake white, but I heat embossed some silver embossing powder over the bow and the sentiment.
Hello everyone! I have a lot of fun card crafting techniques to inspire you today! I’m using more fabulous products from the In Love Arts Shop, and I created five springtime cards using them. For each card I use a different technique. I had so much fun putting these together; I hope you are inspired to try some, if not all, of these techniques!
I also have a coupon code for 15% off your purchase at the In Love Arts Shop : S5581.
Card #1: Good Times Wave Card
All that this card involves is a lot of die cutting, but I love how it turned out. This wave die cut is a lot of fun to play with! I cut out two panels at the same time and kept switching out the colors. I covered a piece of white card stock with tape runner and paper pieced it all back together.
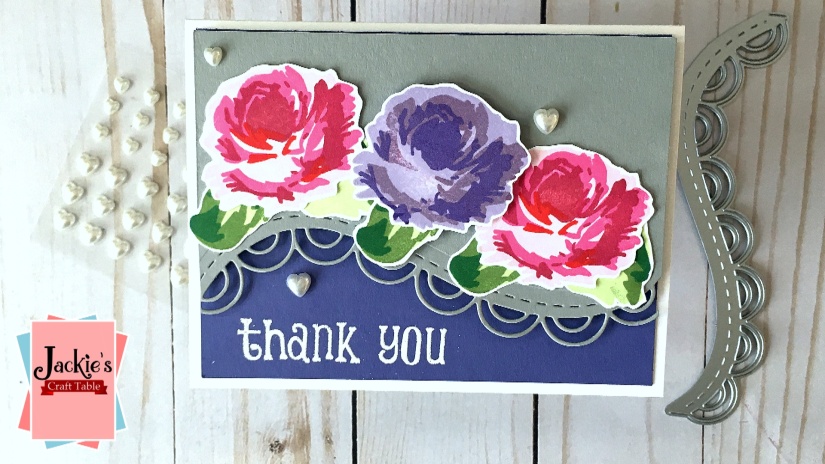
Card #2: Layer Stamping Peony Card
Layer stamping is so much fun to do, and it’s great to have stamps like this in your stash for the days you don’t feel like coloring. I love the painterly look of these peonies. I also used a scalloped die to cut out a pretty edge to the gray card stock. I heat embossed the sentiment with white embossing powder.
Card #3: Tone-on-Tone Hello Spring Card
I love background stamps, and the delicate leaves on this one are so pretty. I had fun stamping it out several times and on several different colors of card stock. I cut them out into banners and adhered them down flat onto a kraft card stock panel. I used die cuts for my sentiment, and this card was done.
Card #4: Colored Pencil Flowers Card
I love big floral images, and I pulled out my Prismcolor pencils to color this in. I cut off two corners with the wave die and used some striped pattern paper behind it.
Prismacolor Pencils: Purple Flowers – Violet 932, Lilac 956, White 938; Flower Centers – Sunburst Yellow 917, Beige Sienna 1080; Leaves – Peacock Blue 1027, Light Aqua 992, Light Green 920; Fans – White 938, Deco Peach 1013, Electric Blue 1040, Background – Sand 940
Card #5: Leaves Embossed Birthday Card
With embossing folders you can create some very fast cards. All I did on this card is emboss it, ink blend some Picked Raspberry Distress Oxide Ink onto the panel, and add a die cut sentiment. However, I decided to add another step–I used a very sharp Prismacolor pencil to color in some of the leaves around my sentiment. I also added some translucent enamel dots and Spectrum Noir Clear Glitter Pen over my sentiment, so maybe it wasn’t that fast after all–Lol!
Hello and welcome! I’m collaborating again with the In Love Arts Shop, and I created 5 very different cards with some fabulous products from the shop. There is quite a wide variety of crafting products available, and to create my cards I used their cutting dies, stamps, pattern paper and enamel dots. I also have a 15% off coupon code for you if you’d like to check out the shop: S5581 Here is the link to the shop: In Love Arts
Card #1: Sweet Thank You Card
The stamp set is called Waiting Girl, and she is just adorable. I stamped her onto a piece of white card stock and cololred her in with Copic markers. I used a beautiful piece of striped pattern paper behind my main panel called Love Forever. I really love the simplicity of this card. I think this image would also go great with the sentiment, “Thinking of you.”
The star of the show for this card is the darling cutting die called, Love You Bottle Dies. I cut it out several times with different colors of card stock and paper pieced it back together.
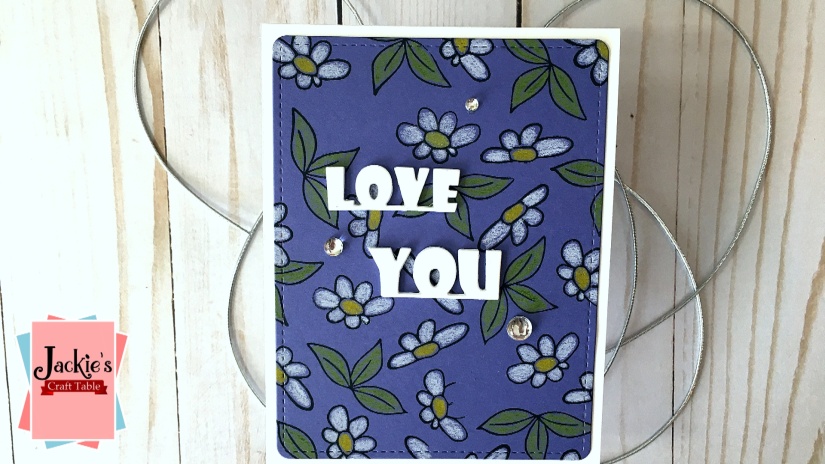
Card #3: Stamped Pattern Love You Card
I used the Waiting Girl stamp again for this card, but just the smaller images. I stamped them randomly across my purple panel with VersaFine Onyx Black Ink. I love this ink; it’s crisp and dark. Then I pulled out some colored pencils to quickly color in the images. The word die cuts come from the Love You Bottle Dies. I cut them out 5 times, and used liquid glue to adhere them together. This gave is some fun dimension on my card.
Card #4: Pocket Full of Flowers Card
I really love this little cutting die; it’s called, Flower in Pocket Dies. Getting a card like this in the mail would brighten anyone’s day! I had fun paper piecing the flowers and greenery over the blue die cut. I used another piece of pattern paper from the Love Forever pack behind my die cut.
Card #5: Colored Pencils on Pattern Paper Card
I used another of the little girl images on this card, and this time I stamped her directly on a piece of pattern paper. I love the soft butterflies on this paper, and it was my inspiration for my color palette.
Arteza Colored Pencils: Skin: Earth Red, Yellow Ochre, Peaches & Cream, Hair: Sunflower Yellow, Rust Orange, Hazelnut Brown Dress: Watermelon Pink, Peaches & Cream, Mykonos Blue, Robin Egg Blue
Here is my process video. You can watch it here or over on my YouTube channel in HD. Thank you for stopping by! I hope you have a wonderful week!!
Happy Friday, my crafty friends! I have 5 Valentine’s Day cards to show you. I love designing cards for this holiday! The products I’m using are from the In Love Arts Shop. They asked if I would like to collaborate with them again, and I selected several products from their shop that would be fun to create Valentine’s Day cards with. They also gave me a coupon code to pass along to you! Use the code S5581 to get 15% off your purchase at the In Love Arts Shop! I love their products because they are very unique and have a great price point.
Card #1: Text Block & Flowers Card
I used the following Arteza Real Brush pens to color in these flowers: