10 Cards, 1Kit, Birthday Cards, Card Kits, Spellbinders, Spellbinders Card Kit

10 Cards, 1 Kit | Spellbinders Card Kit of the Month | Wild Hello | June 2021

Hello! Welcome! It’s Club Kit release day at Spellbinders! I’m creating 10 cards today using June’s kit called, “Wild Hello.” This kit is great if you need more birthday cards; however, there are dies, stamps, ephemera and journaling cards that cover all kinds of occasions. One of my favorite things from this kit is the die set. They are sentiment strip dies. It’s a set that I will store in my little bin next to my desk so I can reach for them often.

I was a bit overwhelmed by all the cuteness in this kit, so I decided to begin with the pattern paper as my inspiration. I pulled out a piece and used ephemera, journaling cards, chipboard stickers to coordinate with it. You can create a lot more than just 10 cards with this kit; I always have lots of supplies left over.

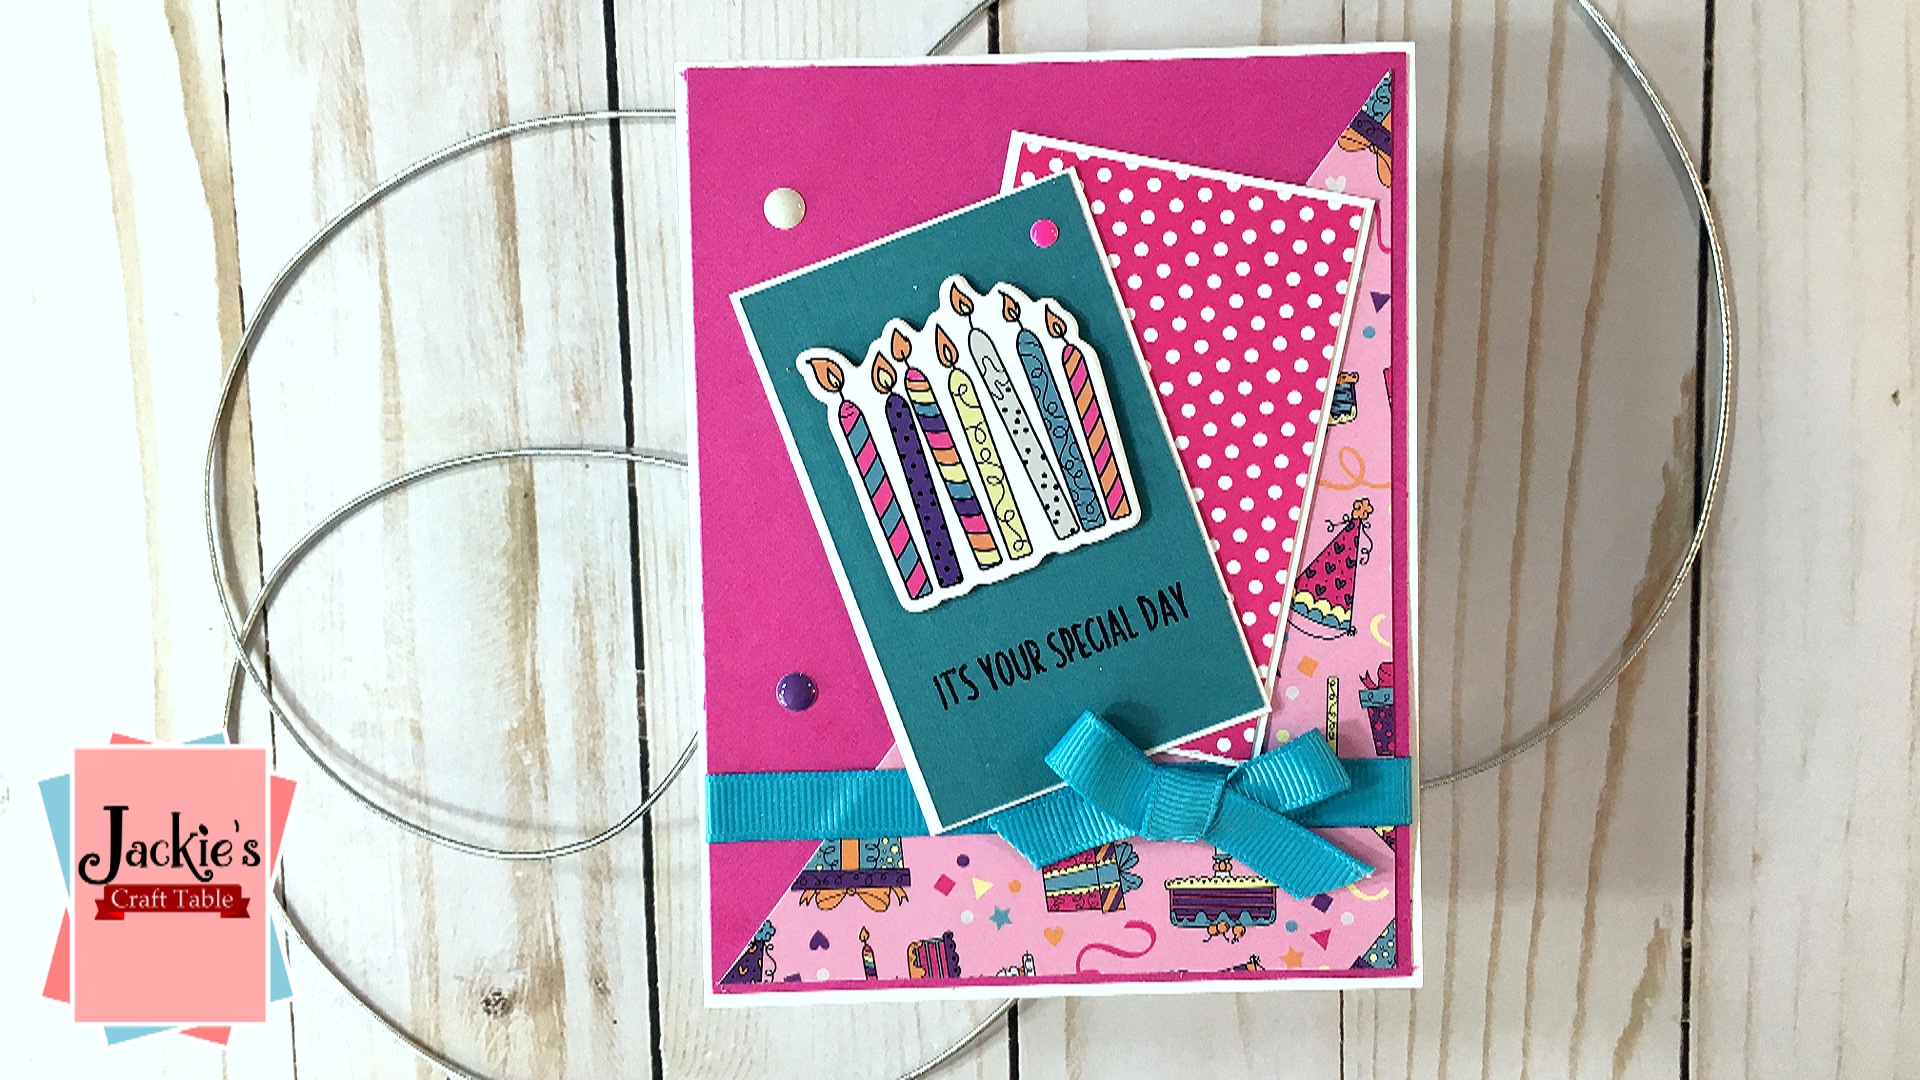
I actually created 11 cards with this kit, and I would have kept on creating cards if I had the time. However, I will be going back and creating more cards with this fabulous kit.

Here are pictures of all 11 cards:

Here is the process video. I hope you enjoy!

Thank you for stopping by! Have a lovely day!

Featured Products Links:

June’s Card Kit of the Month – Wild Hello: http://shrsl.com/2zszo

Club Kit Extras: http://shrsl.com/2zszr

Fancy Edge Oval Dies: http://shrsl.com/300hr

Circle Dies: https://shrsl.com/2z96w

Life is a Party Kit (I used the cutting dies from this kit.) http://shrsl.com/300j7

Tools:

Spellbinders Die Cutting Machine 8.5 Platform: https://shrsl.com/2ynmy

Detail Tweezers: http://shrsl.com/2ydxg

Reverse Tweezers: http://shrsl.com/2ydxi

Scissors: http://shrsl.com/300j1

6 ax 6 Glitter Cutting Plates: http://shrsl.com/2ydxk

Standard Glitter Cutting Plates: http://shrsl.com/2ydxn

Magnetic Pick-Up Tool: http://shrsl.com/2ydxo

Grid Paper Pad: http://shrsl.com/2ydxr

Crystal Mix Gems: http://shrsl.com/2ydxt

Silver Mix Gems: http://shrsl.com/2ydxu

Gold Mix Gems: http://shrsl.com/2ydxw

Kokuyo Dotliner: https://amzn.to/2MwZ2gS

Glue Dots Micro: https://amzn.to/3i5nvr0

Best Ever Craft Tape: http://shrsl.com/2rdxo

Precision Craft Glue: https://shrsl.com/2w0lu

Spellbinders Craft Pick Tool: https://shrsl.com/2k5i9

Diamond Shaped Magnet: https://shrsl.com/2d1i3

Jackie’s Craft Table Sequin Trays: https://etsy.com/shop/JackiesCraftTable

Jewel Picker: https://amzn.to/3qqzEHR

Jackie’s Craft Table Glue: https://etsy.com/shop/JackiesCraftTable

Misti Stamping Tool: https://amzn.to/355iYNZ

Wink of Stella Glitter Pen: https://amzn.to/3yRmQQ5

Darice Foam Strips: https://amzn.to/3fZW0MR

Inks:

Kitsch Flamingo Distress Oxide Ink: https://amzn.to/2TxjxNR

Squeezed Lemonade Distress Oxide Ink: https://amzn.to/3fANepB

Salty Ocean Distress Oxide Ink: https://amzn.to/3gZvqFR

Some of the links above are affiliate links, which means I receive a small commission on sales at NO EXTRA COST to you. Thank you!

@teamspellbinders #Spellbinders #neverstopmaking #spellbindersclubkits

Birthday Cards, Floral Cards, Spellbinders

Arched A2 & Slimline Card Creator | Spellbinders Small Die of the Month – May

Hello! I hope you are having a great start to your week. I get to show another of the Spellbinders club kits for May. This one is called Arched A2 & Slimline Card creator. I created an A2 size card, but I will definitely be using this to create a slimline card another time. There are 5 gorgeous dies in this set–perfect for the die cut inlay technique or just putting your die cuts on some pretty cardstock. I did both to this card.

I cut out the dies with white cardstock twice. I wanted to add a little more dimension on my card than one layer provides. I glued one down first onto a piece of Poppy Field cardstock, and then I did a little bit of die cut inlay. I cut out the domed piece with Beeswax cardstock, and then I was able to easily inlay the yellow triangles. This gave the card a pop of color. I also cut out the rectangle strip with Teal Topaz cardstock and pieced the polka dots back in. After I was done inlaying the pieces, I glued another white die cut on top.

I used the Simply Perfect Layered Blooms to cut out a flower and leaves to add to the top of the card. I turned this into a birthday card using the Clear Stamp of the Month for May. A silver bow and some teal gemstones added a pop of sparkle to the card.

Below you will find my process video:

Thank you for visiting my blog!!

Featured Products Links

May Small Die of the Month: http://shrsl.com/2y71y

Simply Perfect Layered Blooms Dies: http://shrsl.com/2y4m3

May Clear Stamp of the Month: http://shrsl.com/2y4lq

Tools:

Kokuyo Dotliner: https://amzn.to/2MwZ2gS

Precision Craft Glue: https://shrsl.com/2w0lu

Best Ever Craft Tape: http://shrsl.com/2rdxo

Spellbinders Craft Pick Tool: https://shrsl.com/2k5i9

Diamond Shaped Magnet: https://shrsl.com/2d1i3

Jackie’s Craft Table Sequin Trays: https://etsy.com/shop/JackiesCraftTable

Jackie’s Craft Table Glue: https://etsy.com/shop/JackiesCraftTable

Jewel Picker: https://amzn.to/3qqzEHR

Inks:

VersaFine Onyx Black Ink: https://amzn.to/3vbTLMG

Paper:

Poppy Field: http://shrsl.com/2u45b

Beeswax: http://shrsl.com/2u44n

Teal Topaz: http://shrsl.com/2u468

Some of the links above are affiliate links, which means I receive a small commission on sales at NO EXTRA COST to you. Thank you!

@teamspellbinders #Spellbinders #neverstopmaking #spellbindersclubkits @amazingpapergrace @amazingpapergrace_creates

2018 Valentine's Day Series, Birthday Cards, Spellbinders

Borders & Sentiments Stamping | Spellbinders Clear Stamp of the Month – May

Happy Monday, my friends! Let’s start the week out right with a little bit of stamping! Spellbinders Clear Stamp of the Month for May is all about stamping sentiments and borders on your cards. This set is packed with unique sentiments, and floral borders. It pairs with the other Club Kits for May; however, I’m not going to use the other clubs to create my card. Some of you may only subscribe to this kit, so I’ll show you how I used this set without the other clubs.

To create this card I used my Misti Stamping Tool. This helped me stamp evenly up and down the card panel. First I stamped out the happy birthday sentiment and then I stamped out the floral stamps by shifting along the edge of the Misti. I created a diamond pattern by using all three of the floral strips. I used Grape Jelly Memento ink to stamp out these florals.

I cut down my stamped panel and glued it onto a piece of Black & White Stripes pattern paper. I then changed my mind on the sentiment that I stamped flat onto the purple panel, and I stamped it again on a piece of dark purple cardstock, heat embossed it with white embossing powder and popped it up on some foam strips.

I used the Simply Perfect Layered Blooms dies to create the flowers on this card.

Below is my process video!

Thanks for stopping by, and I hope you have a wonderful week!

Featured Products Links

May Clear Stamp of the Month: http://shrsl.com/2y4lq

Simply Perfect Layered Blooms Dies: http://shrsl.com/2y4m3

Tools:

Misti Stamping Tool: https://amzn.to/3tjgANa

Kokuyo Dotliner: https://amzn.to/2MwZ2gS

Precision Craft Glue: https://shrsl.com/2w0lu

Best Ever Craft Tape: http://shrsl.com/2rdxo

Spellbinders Craft Pick Tool: https://shrsl.com/2k5i9

Diamond Shaped Magnet: https://shrsl.com/2d1i3

Jackie’s Craft Table Sequin Trays: https://etsy.com/shop/JackiesCraftTable

Jackie’s Craft Table Glue: https://etsy.com/shop/JackiesCraftTable

Jewel Picker: https://amzn.to/3qqzEHR

Inks:

VersaFine Onyx Black Ink: https://amzn.to/3vbTLMG

Paper:

Black & White Stripes Pattern Paper: http://shrsl.com/2y4np

Beeswax: http://shrsl.com/2u44n

Peridot: http://shrsl.com/2u45u

Rainforest: http://shrsl.com/2u45s

Purple Mist: http://shrsl.com/2u46c

Royal Amethyst: http://shrsl.com/2u46d

Some of the links above are affiliate links, which means I receive a small commission on sales at NO EXTRA COST to you. Thank you!

@teamspellbinders #Spellbinders #neverstopmaking #spellbindersclubkits @amazingpapergrace @amazingpapergrace_creates

Arteza Art Products, Arteza Everblend Markers, Birthday Cards, Card Kits, Gel Pens, Pink & Main

10 Cards, 1 Kit | Pink & Main March Card Kit | Celebrations

Congratulations to Pink & Main! This month is their 6 year anniversary. To celebrate, their March card kit is all about birthdays. I created 10 cards with this kit. For the first 5 cards, I used card sketches, and for the last 5, I did whatever I wanted. I had intended only to create 5 cards, but this kit was very inspiring.

Below you will find pictures of all the cards I created with this fabulous kit, my process video, and links to all the supplies.

Image1

Card #1: Gelly Roll Candles Card

Image2

Card #2: Banner & Pattern Paper Card

Image3

Card #3: It’s Your Special Day Card

Image4

Card #4: Always Room for Cake Card

Image5

Card #5: My Gift to You Card

Image6

Card #6: Make a Wish Card

Image7

Card #7: Banners & Party Hat Card

Image8

Card #8: Candles Border Card

Image9

Card #9: Embossed Happy Birthday Card

Image10

Card #10: Stripes and Polka Dots Card

Image11

Here is my process video. You can watch it here or over on my YouTube Channel in HD.

Thank you for visiting my blog! I hope you have a wonderful day!!

Featured Products:

Pink & Main Card Kit: http://shrsl.com/26gq7

Jackie’s Craft Table Glue: https://etsy.com/shop/JackiesCraftTable

Art Mediums:

Arteza Everblend Alcohol Markers Page: https://arteza.com/b/alcohol-markers?utm_source=postaffiliatepro&utm_medium=affiliate&a_aid=Youtube_JackiesCraftTable

Arteza Everblend Alcohol Markers 120:

https://arteza.com/collections/markers/products/everblend-art-markers-alcohol-based-set-of-120?utm_source=postaffiliatepro&utm_medium=affiliate&a_aid=Youtube_JackiesCraftTable&a_bid=fa1eb31d

Arteza Everblend Alcohol Markers 60: https://arteza.com/collections/markers/products/everblend-art-markers-set-of-60?utm_source=postaffiliatepro&utm_medium=affiliate&a_aid=Youtube_JackiesCraftTable&a_bid=712fc9f4

Gel Pens Moonlight: https://amzn.to/2y19DJy

Tools:

Glitter Brush Spectrum Noir: https://amzn.to/3afpYZs

Mini Misti: https://amzn.to/2LpHJva

Original Size Misti: https://amzn.to/2A8jbjA

Magnets: https://amzn.to/2NShv60

Wagner Heat Tool: https://amzn.to/2UljEum

Fiskars Paper Trimmer: https://amzn.to/2NR4Xvw

Score Board: https://amzn.to/2NSMA9z

Cutter Bee Scissors: https://amzn.to/34EWamG

Jewel Picker: https://amzn.to/2QCKUSe

Blending Brushes: https://amzn.to/2AYumf8

Foam Blending Tool: https://amzn.to/35naIHB

Sizzix Big Shot Machine: https://amzn.to/2N8nkN0

PenBlades: https://amzn.to/2IEUPT9

Mini Die Cut Machine: https://amzn.to/33jJcZI

Inks & Adhesives:

Simon Says Stamp Intense Black Ink: https://www.simonsaysstamp.com/product/Simon-Says-Stamp-Premium-Ink-Pad-INTENSE-BLACK-ink065?currency=USD

VersaFine Onyx Black Ink: https://amzn.to/397Npmx

Jackie’s Craft Table Glue: https://etsy.com/shop/JackiesCraftTable

Arteza Foam Tape: https://arteza.com/collections/new-arrivals/products/foam-mounting-tape-36-yards?utm_source=postaffiliatepro&utm_medium=affiliate&a_aid=Youtube_JackiesCraftTable&a_bid=ba7b4939

Scotch Foam Tape: https://amzn.to/2LrZppX

Score Tape: https://amzn.to/2pj0Tdy

Kokuyo Dotliner: https://amzn.to/2LqAkvq

Kokuyo Refills: https://amzn.to/2LALkoI

Post-It Note Masking Tape: https://amzn.to/2oiw9cx

Paper:

Neenah Solar White 110 lb Card Stock: https://amzn.to/2Q20E3a

Some of the links above are affiliate links, which means I receive a small commission on sales at NO EXTRA COST to you. Thank you!


Arteza Art Products, Birthday Cards, Shaker Cards

Shaker Card Techniques using Arteza Holographic Chunky Glitter & Foam Tape

Hello everyone, Happy Friday! I love creating shaker cards, and I created a few with some fun products from Arteza. Today I’m using their beautiful Holographic Chunky Glitter and Foam Tape–the two most important ingredients for making shaker cards! I believe shaker cards are best when they are birthday shaker cards, so I made three–all using different techniques.

I have an Arteza coupon code for 10% off your purchase and links to the supplies I used below!

2020 Arteza Shaker Cards THUMB

Card #1: Happy Birthday Balloons Card

Shaker elements don’t have to be very large. On my first card I used a small balloon die to create the windows for my shaker bits. I cut down the foam tape so that it would fit around the window. Make sure you take off the release paper to do this–it makes is easier to manipulate. I then spooned in the 3 different chunky glitters and sealed them in tight with a piece of card stock. I trimmed it down and added it onto my card base.

card1

Card #2: Masculine Birthday Shaker Card

Stamping your sentiment right onto the acetate window is another way to add impact to your card. I used StazOn ink in black, but it comes in many colors. After you use this ink, you’ll need to clean it with StazOn Stamp Cleaner to clean off your stamps. (Link below)  Also, if you mis-stamp on the acetate, you can wipe off the ink from the acetate with rubbing alcohol and stamp again. This was an easy shaker card to put together because I didn’t need to manipulate the foam tape. I just put it down in straight lines. card2

Card #3: Word Sentiment Shaker Card

It’s really fun to create shaker windows behind your die cut sentiment. It make’s your sentiment sparkle in an unexpected and fabulous way. I cut down narrow strips of foam tape for this shaker element so that it would fit around my sentiment. I spooned in the Electra glitter and captured it with a piece of pale gray card stock. I then attached it to a piece of diagonal striped pattern paper, added some candle die cuts and stamped a small sentiment.

card3

Here is the process video for these cards. I hope you enjoy watching it and are inspired to create some fabulous shaker cards!

Have a wonderful weekend, everyone!!

For 10% off your purchase, use the Coupon Code: JackiesCraftTable4. This coupon code is valid February 8th through March 13th 2020.

Visit the ARTEZA YouTube channel for more inspiration:  https://www.youtube.com/arteza

Supply Links

ARTEZA US Site: http://arteza.com/?utm_source=postaffiliatepro&utm_medium=affiliate&a_aid=Youtube_JackiesCraftTable

ARTEZA EU Site: https://arteza.co.uk/?utm_source=postaffiliatepro&utm_medium=affiliate&a_aid=Youtube_JackiesCraftTable

The links below will take you to specific products that I mentioned in this video:

Foam Mounting Tape: US:

https://arteza.com/collections/new-arrivals/products/foam-mounting-tape-36-yards?utm_source=postaffiliatepro&utm_medium=affiliate&a_aid=Youtube_JackiesCraftTable&a_bid=ba7b4939

Foam Mounting Tape: UK:

https://arteza.co.uk/products/foam-mounting-tape-36-yards?utm_source=postaffiliatepro&utm_medium=affiliate&a_aid=Youtube_JackiesCraftTable&a_bid=3e99a61a

Holographic Chunky Glitter Fairy Dust & Moonstone: US:

https://arteza.com/collections/crafting/products/holographic-glitter-shakers-3-colors-unicorn-silver-iridescent-5-g-each?utm_source=postaffiliatepro&utm_medium=affiliate&a_aid=Youtube_JackiesCraftTable&a_bid=d3564c9f

Holographic Chunky Glitter Mermaid Rain & Electra: US:

https://arteza.com/collections/crafting/products/holographic-glitter-shakers-2-colors-mermaid-mermaid-dreams-total-10-g-each?utm_source=postaffiliatepro&utm_medium=affiliate&a_aid=Youtube_JackiesCraftTable&a_bid=f7274bfa

Holographic Chunky Glitter: UK:

https://arteza.co.uk/products/holographic-glitter-shakers?utm_source=postaffiliatepro&utm_medium=affiliate&a_aid=Youtube_JackiesCraftTable&a_bid=4f019cd9


Featured Products:

Big Birthday Greeting Stamps: https://www.simonsaysstamp.com/product/Simon-Says-Clear-Stamps-BIG-BIRTHDAY-GREETINGS-sss201984-Celebrate-You-sss201984?currency=USD

Big Birthday Greetings Dies: https://www.simonsaysstamp.com/product/Simon-Says-Stamp-BIG-BIRTHDAY-GREETINGS-Wafer-Die-sssd111986-Celebrate-You-sssd111986?currency=USD

Jackie’s Craft Table Glue: https://etsy.com/shop/JackiesCraftTable

Olive and Oak Styling Mats: https://www.etsy.com/listing/662738170/styling-board-linen-double-sided?ref=related-2&frs=1

Tools:

Mini Misti: https://amzn.to/2LpHJva

Original Size Misti: https://amzn.to/2A8jbjA

Magnets: https://amzn.to/2NShv60

Craft Pick: https://amzn.to/32fhG0n

Fiskars Paper Trimmer: https://amzn.to/2NR4Xvw

Score Board: https://amzn.to/2NSMA9z

Tim Holtz Scissors: https://amzn.to/39pGTre

Cutter Bee Scissors: https://amzn.to/34EWamG

Mini Die Cut Machine: https://amzn.to/33jJcZI

Inks & Adhesives:

StazOn Ink: https://amzn.to/2T65fzX

StazOn Stamp Cleaner: https://amzn.to/32fCO6Q

VersaFine Onyx Black Ink: https://amzn.to/397Npmx

Jackie’s Craft Table Glue: https://etsy.com/shop/JackiesCraftTable

Kokuyo Dotliner: https://amzn.to/2LqAkvq

Kokuyo Refills: https://amzn.to/2LALkoI

Paper:

Acetate Sheets: https://amzn.to/38OWTTY

Neenah Solar White 110 lb Card Stock: https://amzn.to/2Q20E3a

Pattern Paper, Winter Wonderland 6×6 pad: https://pinkandmain.com/winter-wonderland-6×6-paper-pad/

Some of the links above are affiliate links, which means I receive a small commission on sales at NO EXTRA COST to you. Thank you!

Birthday Cards, Floral Cards, Hand Drawn Florals, Watercolors

Arteza Products Review & Floral Card 2019

Hello everyone! I have some fun products that I’m reviewing today.  Arteza contacted me and asked if I’d like to review some of their art supplies. They sent me a 48 pack of their Real Brush Pens. I have the Zig Clean Color Real Brush Markers, which I really love, but I’ve heard some great things about Arteza’s Real Brush Pens. They also sent a two pack of their watercolor pads, a set of bone folders, and three packs of Holographic Chunky Glitter.

2019 Arteza THUMB

First I swatched all the Real Brush Pens onto a piece of the watercolor paper that they sent me. The colors are all vibrant and beautiful, and I really like the names they came up with for their colors. I had some difficulty getting the colors to move on their watercolor paper with a water brush–I wanted to achieve a gradient from each of the pens. However, I found that if I first dipped the pen into clean water and then onto the paper, I could create a nice gradient effect. Also, Bristol Smooth paper is a great paper to use with these brushes. The coating on the paper allows you to blend and move the pigments beautifully.

To color my flowers, I put down my lightest pigments first using this technique and slowly built up my colors. I left a lot of white space on my flowers for highlights. To color in my light blue background around my flowers, I scribbled the True Blue pen onto my acrylic block and diluted it with water and painted around my flowers with the water brush that came with the pens.

I really enjoyed using all of the products they sent me. On their website they say that their goal is to provide quality, affordable art supplies to put into the hands of the creators, and in my opinion, they have accomplished this goal with these products that they sent to me.


Poppy Birthday Card:

Real Brush Pens used: Rouge Pink A190, Red A101, Light Magenta A184, Walnut Brown A164, Green Tea A154, Crocodile A126, Olive Green A146, True Blue A168

IMG_8200

On the inside of the card I painted a strip of the same watercolor paper with the Rouge Pink pen. I again dipped the pen in clean water to lighten the pigment and then colored it along the paper until the pen’s natural pigment came out. I then adhered it to the inside of my card with liquid glue.

IMG_8201

Check out my video here or over on my YouTube channel in HD. Thank you for stopping by! I hope you have a wonderful day!

—Supply List—

Use this 10% OFF coupon code:  JackiesCraftTable1 

ARTEZA US Site: http://arteza.com/?a_aid=Youtube_JackiesCraftTable

ARTEZA EU Site: https://arteza.co.uk/?a_aid=Youtube_JackiesCraftTable

This coupon code is valid until September 18, 2019.

Visit the ARTEZA YouTube channel for inspiration: https://www.youtube.com/arteza

The links below will take you to specific products that I mentioned in this video:

48 Real Brush Pens

US: https://arteza.com/collections/markers/products/watercolor-real-brush-pens-set-of-48?a_aid=Youtube_JackiesCraftTable&a_bid=71ef2756

EU: https://arteza.co.uk/collections/markers/products/watercolour-real-brush-pens-48-colours?a_aid=Youtube_JackiesCraftTable&a_bid=db5de56a

Bone Folders

US: https://arteza.com/collections/crafting/products/bone-folder-set-of-4?a_aid=Youtube_JackiesCraftTable&a_bid=8c34d00b

EU: https://arteza.co.uk/products/arteza-bone-folders-set-of-4?a_aid=Youtube_JackiesCraftTable&a_bid=f8d66911

Holographic Chunky Glitter – Fairy Dust & Moonstone

US: https://arteza.com/collections/crafting/products/holographic-glitter-shakers-3-colors-unicorn-silver-iridescent-5-g-each?a_aid=Youtube_JackiesCraftTable&a_bid=d3564c9f

Holographic Chunky Glitter – Mermaid Rain & Electra

US: https://arteza.com/collections/crafting/products/holographic-glitter-shakers-2-colors-mermaid-mermaid-dreams-total-10-g-each?a_aid=Youtube_JackiesCraftTable&a_bid=f7274bfa

Watercolor Pads 9×12, 2 Pack

US: https://arteza.com/collections/sketchbook-paper/products/watercolor-pad-9×12-32-sheets-2-pack?a_aid=Youtube_JackiesCraftTable&a_bid=c49d17d2

EU: https://arteza.co.uk/collections/sketchbook-paper/products/watercolor-pad-9×12-32-sheets-2-pack?a_aid=Youtube_JackiesCraftTable&a_bid=fb309806

Sentiment from Altenew Floral Frames: (SSS) https://www.simonsaysstamp.com/product/Altenew-FLORAL-FRAME-Clear-Stamp-Set-AN368?currency=USD

Strathmore Bristol Smooth Paper: https://amzn.to/2KQPB7i
Kneaded Eraser: https://amzn.to/31LjUmw
Eraser Pencil with Brush: https://amzn.to/31LkdOc
Fiskars Paper Trimmer: https://amzn.to/31QHBdj
Mini Misti: https://amzn.to/2KQQ0GQ
VersaFine Onyx Black Ink: https://amzn.to/2Nk0VvI
Lawn Fawn Liquid Glue: https://amzn.to/2ZcW5m3
Scoring Board: https://amzn.to/31RoI9Y
Jewel Picker: https://amzn.to/31QCPg4
Triangle Dish: https://amzn.to/2HhbknT
Dotliner: https: //amzn.to/31OIWBf
Dotliner Refill: https://amzn.to/2Z43WXV

The links above are affiliate links, which means I receive a small commission on sales at NO EXTRA COST to you. Thank you!

Birthday Cards, Copic Coloring, Floral Cards, Uncategorized

Daisy Delight Birthday Cards (2018) |Gem Watercolors & Copic Markers

Hello! Welcome to my blog! I recently visited the Gina K store again in Wisconsin for a class on Brush Lettering. It was a fabulous class, and I learned a lot–more to come on that later. On the way out of her store it’s impossible not to stop and look at all the pretty things in her store. I came across this stamp set called Daisy Delight, and I couldn’t resist buying it. I love large flower stamps. They are so much fun to color in!!

img_4387.jpg

I heat embossed this image with white embossing powder onto a piece of black card stock. I wanted to pull out my Kuretake Gem watercolors and play with them again. They look so dazzling on the black card stock. My pictures of this card hardly do it justice. I painted them in rainbow order, adding a few petals of pink. The trick with painting on black card stock is not to use too much water. Even then my panel buckled a little, but it flattened out as it dried.

Image7

For my second card panel I stamped the image onto a piece of kraft card stock. I’ve never used Copic markers on kraft before, but I found I really liked the effect! It’s more muted but still stunning. Below I scribbled the Copic markers I used for this project onto a piece of kraft as well as a piece of white card stock so you could see the difference.

Image1

I painted about two petals at a time to keep the paper wet–Copics blend better in the fibers of the paper this way.  I went lightest to darkest with my colors and then darkest to lightest again to get a good blend.

Image2

I did some partial die cutting on my two panels. I used a faux stitch die and cut out some of the panel, and then I used my scissors to cut around some of the petals.

Image3

I also used some fun foam behind these panels to add dimension. I added a happy birthday sentiment on these panels, a few embellishments, and these cards were done! I hope you give these techniques a try! They are definitely fun to do!

Image4

Here is the video for these cards! You can watch it here or over on my YouTube channel. Hope you enjoy!! Have a fabulous weekend!!

Supply List:

Daisy Delight stamp set – Gina K Designs

Black Onyx cardstock – Gina K Designs

Tomato Soup cardstock – Gina K Designs

Glimmery White Diamond cardstock – Simon Says Stamp

Nenah Solar White 110 lb cardstock

VersaMark Ink

Extreme Black Ink – My Favorite Things

Mini Misti

Kuretake Gem Colors watercolors

Silver Black Brush #4

White Embossing Powder – Hero Arts

Embossing Bag – Inkadinkado

Copic Markers – R32, R22, R24, R39, Y08

White Prismacolor Pencil

Die-namic – Inside & Out Stitch Round Rectangles – My Favorite Things

YNS Gumdrop Embellishment – Crystal Clear & Sparkle

Black, Gray & White Enamel Dots – Hobby Lobby

Any Occasion Card, Birthday Cards, Copic Coloring, Uncategorized

Magic Slider Cards | Copic Markers

Happy Friday to you all!  I have some fun cards to share today.  I’m using a die set from Lawn Fawn called Magic Color Slider.  I actually won this die set from Jennifer McGuire’s blog last December.  This was the first time I won anything, and I was so excited!!  Thank you, Jennifer!!  The set includes three different window frame dies, so I decided to create a card for each window!

Image6

This is what the set looked like before I opened it and started snipping the dies apart.

Image1

It took some time to chose the colors of cardstock I wanted to use and die cut them, but here are my cards all cut out.  It looks complicated, but once you create one, you get the hang of it, and it’s smooth sailing from there.

Image2

I used a Mini Misti to stamp the images onto Neenah White 110 pound cardstock using MFT’s Extreme Black Ink.  While the images where on the Misti door, I switched out the cardstock for a piece of acetate the same size and stamped the images again.  I used Stazon Ink to stamp on the acetate.  I used two different inks because Stazon is not Copic friendly, and I wanted to color all these images with Copics.

Image3

Once all my coloring was finished, I started to assemble my cards.  I put dot liner on the back of the colored panels, aligned them through the window, and then pressed them into place.  To align the acetate, I put down skor tape around the inside of the windows, peeled off the release paper, placed the acetate over the colored images so they aligned perfectly, and then closed the frame onto it.

Image4

Before sealing the sliders together, I made sure to put in my white slider piece, and then adhered the two sides together with more skor tape.  I pulled the white slider up and down a few times to get it slide smoothly.  These cards can be so addictive to play with!!  Lol!!  I added my sentiments and embellishments on the outside of the slider elements and then adhered them all onto card bases.  Some crafters don’t attach them onto card bases, which is fine, but I wanted to make them into mini cards and enable them to stand up.

Image5

Here is the video I created for these cards!  You can watch it here or over on my YouTube Channel in HD.

Thank you for visiting!  Have a nice weekend!!


Supplies used:

Magic Color Slider – Lawn Fawn

Sizzix Big Shot die cutting machine

Skor Tape

Acetate

Stazon Ink

Extreme Black Ink – MFT

Mini Misti stamp positioner

Blowing Kisses Stamp set – MFT

Sending a Smile Stamp set – MFT

Sweet Thing Stamp set – Gina K

Copic Markers

Neenah Solar White Cardstock

Connect Glue – Gina K

Clear Droplets – Pretty Pink Posh


Birthday Cards, Floral Cards, Inktense Pencils, Uncategorized

Birthday Wishes Card using Inktense Pencils

Welcome back to my craft table!  I’m using a new-to-me medium for my latest card–Inktense pencils.  One of my darling sisters-in-law gave them to me for Christmas, and I’ve been having a lot of fun playing with them.

You use them just like you would a colored pencil to color in your image, but the magics truly happens when you add water!  The colors are vibrant and intense.

I have the set of 36 colors, and I made up a chart so I could see at a glance which colors I want to use on my projects.  It’s kind of hard to see the true color just by looking at the pencil.Image1

I filled up a piece of Canson XL watercolor paper with my stamped images.  At this point I didn’t know how I was going to arrange my card, I was just having fun coloring.  I used two different pencils for each image, and then I used my Zig water brush to paint over my coloring.  Once the paint dries, it is permanent–unlike regular watercolor pencils which can be reactivated with water.  I like this aspect of these Inktense pencils because I can paint on many layers and my coloring stays put.

Image2 - Copy

When I find a floral stamp set that I really love, I like to get the coordinating dies.  Not only does it save me a lot of time cutting them out, but it cuts them out perfectly.  I’m still practicing my fussy cutting skills.

Image3

I spent a lot of time figuring out how I wanted this card to look.  However, with these images you could slap them on in any arrangement, and it’d look beautiful, I’m sure.  Lol!  My sentiment comes from another Altenew stamp set called Floral Frame.

I also used some Pretty Pink Posh water droplets on this card.  I love using these water droplets on floral cards–they look like dew drops and adds a touch of sparkle.

Image4

Here’s my video of how I created this card.  You can watch it here or on my YouTube Channel.


Thanks for visiting my blog!  Happy spring to all of you!


Here’s my list of supplies: